Disc Brake
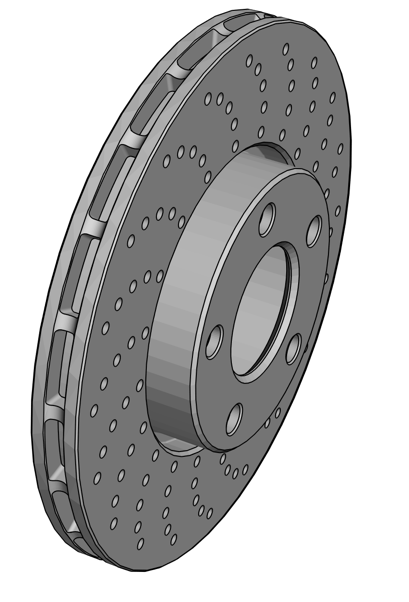
This tutorial aims to illustrate the use of OpenCascadeLink to create a disc plate, which is the main component of a disc brake. The dimensions and the creation procedure are based on a computer-aided design (CAD) tutorial [1,2].
The creation of the disc plate will be done in several stages. First, the main body is created, which includes the disc plate and its hat section. Then, as a second step, holes are added in the hat section, and a single slot is added in the middle of the disc. Finally, a pattern of holes is added over the whole surface of the disc.
Disc plate
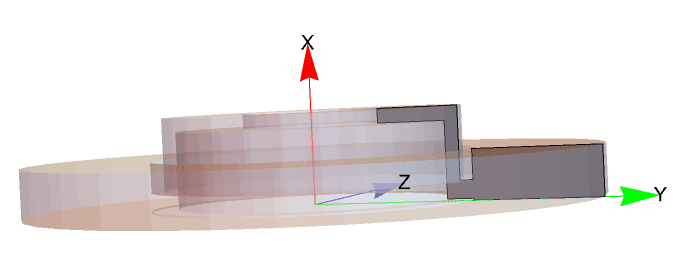
The disc plate will be created by specifying a cross-section in the x-y plane. This cross-section will then serve as a basis for a solid created from a revolution around the x-axis. The cross section is shown below in dark gray inside the opaque disc break.
The cross-section will consist of a single polygon of 12 points ![]() , and the radius of the disc will be of 144 [mm].
, and the radius of the disc will be of 144 [mm].
Note that all points lie in the x-y plane.
Verifying if the objects built are orientated the right way, is essential. For that purpose, one case use OpenCascadeAxis3D.
Next, the cross-section will be revolved around a rotation axis along the x-axis.
A full-element mesh is generated to verify that the boundary mesh construction worked as intended. To speed the creation up a first order mesh is generated.
Now, we are going to apply some chamfers and fillets.
In the current version of OpenCascadeLink, there is no functionality to select a specific edge directly from the visualization for applying a chamfer or fillet. Instead, one needs to specify the edge's identification number (ID) manually. As the model gets bigger, the number of edges will increase, so it is recommended to apply chamfers and fillets as early as possible. To find the actual edges on which to apply the chamfer or fillet a Manipulate, as described in Using OpenCascadeLink, can be useful.
Create two chamfers of radius 3 [mm] at the central hole of the disc plate.
Then, create three other chamfers of of radius 2 [mm].
Next, create three fillets of radius 1 [mm].
And finally, create two chamfers of 1 [mm].
Every time a chamfer or fillet is created, the number of edges increases; consequently, the edges will have a new ID number.
Holes at the hat section
At the top surface of the hat section, five bolt holes of a diameter of 15.3 [mm] will be made around the central hole, and each of them with a chamfer of 1 [mm] on both sides.
To avoid searching and selecting each edge of the created the for making the chamfer we use a different route. The idea is to first create a 'tool' that when applied will leave the desired hole with the champers.
The tool to be created will be composed of three parts, a cylinder for the actual hole and a cuboid at each end of the cylinder. The chamfers will connect between the cylinder and the cuboids on top. Again, the purpose of creating this tool is to generate the hole and chamfers in one go. When applying the tool the disc brake will have the holes with the chamfers included.
Make the holes by computing the difference between the Boolean regions and the disc plate.
Gap
A gap in the middle of the disc is created, consisting of a pattern of rectangle cuts that goes around the disc. First, a boss is created using Polygon, which will make the cut all around the disc. The boss will be revolved by 15° on each opposite side to make it symmetric to the y-axis. Then, a circular pattern will be created around the axis of revolution with 20 instances. These 20 instances will cut the disc plate.
Each of the 20 cuts must have a fillet in its four corners. To avoid applying a fillet in each edge, we first apply a fillet of radius 2 [mm] to the four corners of the boss. Then we compute the difference between the bosses and the disc plate.
Finally, to round any edge left, a torus is created at the middle of the slot, and a cut is made.
Holes at the disc surface
The following holes of diameter 6 [mm] follow a specific pattern. The pattern consists of five holes that follow a curve made of an arc of a circle, where each hole is equally spaced along the curve. This particular pattern is replicated 20 times around the x-axis.
An arc circle is the curve segment between two points along a section of the circumference of any circle. To trace such an arc, one must define the center of the circle, its radius, and its central angle.
In this case, the arc was not defined by specifying its radius, center, and angle; instead, these properties were defined automatically by placing the arc inside a rectangle with a height of 30 [mm] and a width of 38 [mm]. The rectangle was placed at the y-z plane, 88 [mm] away from the origin and with an angle of 4.55° to the z-axis.
The arc intersects the rectangle at the top left and bottom right corners. By doing these, the geometric properties of the arc are defined automatically.
In our case, we need to do this procedure manually.
The formula used to calculate the radius is the following:
Now that we have the radius and the coordinates in which the two points of the arc should coincide, we can solve a couple of equations to know the center of the circle and its angle. The result will be given as a set of rules.
The parametric equation of a circle not centered at the origin is given by:
Because there are two pairs of coordinates, there will be four equations to solve. The variables to be solved are ![]() ,
, ![]() ,
, ![]() , and
, and ![]() .
.
The first set of rules gives the solution we are looking for.

